Omega 6.5: A Brief Review

time-money-side

You know what they say: “Time is money.”

With each upgrade of software you evaluate, it is your time and efficiency, that you need to consider. Omega Version 6.0 was a time saver, and if you neglected to upgrade to 6.0, you should download both the “whats-new-omega-6.0” and “whats-new-omega6.5” to see what you’re missing.

This upgrade to Gerber Omega 6.5 is another time saver.


Time saver #1: Starting with the new “Groups of Groups”, I can’t tell you how many times I could have used that when working on complex art with lots of shapes. There are also some useful options when holding your Ctrl button down, such as breaking groups out from larger groups into new groups. This will definitely speed up your work flow.


Time saver #2: If you have had to import customer files that are typically assigned process colors in RGB mode, the colors will change when they are converted to CMYK in previous versions Omega. However, in 6.5, if you change the mode from RGB to CMYK in your design software, and then import an EPS, AI, or PDF file, you can check a box called “Import pure CMYK colors”, and the colors will come in with the correct values. A huge time saver!

The new pdf file export capability offers the same export options as the GSP EPS format, including named spot and CMYK colors, and named paths and strokes for Cut Contours. For presentations, it makes it easy for prospects to open it in their PDF viewer. For exporting to other desktop publishing and ink jet design programs, the exported pdf will preserve the named spot colors and named cut contour objects.


Time saver #3: If you are like me, I think Composer has always had great detail editing tools. And in recent years it has only gotten better. Now in 6.5 there is a “Change Constraints” tool in the layout drop down menu that allows you to set constraints for the detail tools such as the line tool, the slice and dice tool, the cleaver tool, and the move point too. You can set them for angles such as 5°,10°, 30°, 45°, etc. Then the constraint is initiated when you hold the Alt key down. If you use the “on axis” tool to move objects along the X or Y axis when you want them to stay aligned with their original position, it is similar to that, but you now have more choices. I know I will love this tool.


Time saver #4: The new ability to toggle between wire frame and filled while you are in a dialog box. You can also zoom or pan while in a dialog box. I will find this especially helpful with the choke and spread tool to verify which color is spreading.

Are they reading my mind? It just keeps getting better.


Time saver #5: When outlining lettering or other shapes with inside shapes, there are times when you don’t want the inside shapes to be outlined. Now, rather than ungrouping all the inside shapes, or deleting the outlines afterwards, all you have to do is select the “Outside Contour Only” check box within the outline tool. This will work great for creating perimeter cuts for back cutting, and many other instances where you would rather not deal with outlines on inside shapes.

Gerber has also eliminated a step with a new feature in the Shadow feature, which is “hide originals.” This comes in handy when creating an outline first, shadowing it, and then having to delete the original. It can also be used as a substitute for using the relief feature in the Shadow dialog box.


Time saver #6: A new Back Cut Template file allows you to save all your plotter settings for your back cut files. In other words, whatever you set in your “rules” or “settings” dialog, i.e.: multi cuts, speed, force, acceleration, cornering, for each layer, it can be saved for recall on another job. It’s much like saving parameters, but for back cut jobs. This will save lots of time for companies who do a lot of back cutting with various settings.


The final feature worth mentioning is called the “PLT Extract” program, which extracts useful summaries of plot information such as consumables used. With that information, the user can then go back and compare actual vs. estimated material used in the job. This is useful information if you do such comparisons, and may aid with estimating needed materials for future, similar jobs.

The PLT Extract program will be good for in plant applications when the job has been completed. It will help tally up the consumables used for comparison, budgeting and material inventory purposes. The reason it doesn’t work for estimating is that the job is typically not created in Composer before it is committed to by the customer for a purchase price.

clocks-thin

All in all, I think Omega 6.5 is well worth the upgrade price, because it saves time. If the cost of your time is only $.50 per minute, and you save 10 minutes per design, the upgrade from 6.0 to 6.5 will be paid for in a little over 13 hours. When tools becomes easier to use, work is more pleasurable. And with this upgrade, you will gain more time.

To upgrade to Omega 6.5, click here.

Client’s Verdict on the Pro-Patch™!

Here’s a testimonial from an actual rider who used Pro-Patch™ and was so impressed with it, he decided to write to us about it. We usually hear from graphic shops, not the end user.  So this was a special treat, because he included the pictures below. Of course when he refers to who he received his finished product from, he is referring to the graphic shop.

Dear Graphic Marking Systems Team,

I am writing to inform you that I received my Convex Pro-Patch™ Vinyl art and I’m very impressed with the product.  I am a sponsored motorcycle road racer, and due to the nature of the sport, we are required to wear leather apparel on the racetrack, in case we have any mishaps.

Many road racers customize their leathers with sponsorship using embroidered, PVC, leather and other materials for patches, but the final product is usually either expensive, low-resolution, or will not withstand the elements.  Additionally, since crashes are a frequent occurrence, the expense to replace those patches is very high. I took a “shot in the dark” with the Convex Pro-Patch™ and, I’ve been very impressed with the results.

Convex Pro-Patch™ is a sewable vinyl that can be printed in high resolution and is resistant to the outside elements. Once the Pro Patches were produced, I cut them to size, glued them onto my leather suit and had them sew on to the leather.  The final product looked amazing!

Thank you so much for a wonderful product and I look forward to more interaction with your company!

Best Regards,

R. Alan

Ph.D., W.S.M.C #35

Sponsors: Bridgestone, CM motorsports, Cyclemall.net, TrackXperience, A Thin Line

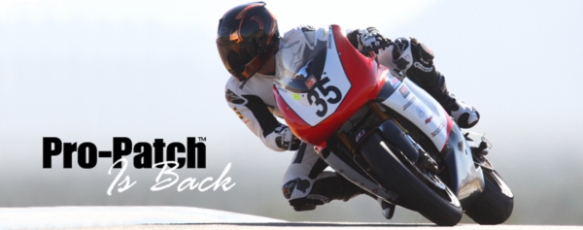
Like niche products? Pro-Patch™ is back!

PPisBack-Level-3-Turn600x237For those of you who remember Convex Pro-Patch™ from way back in 2008-2009, it was a very soft 12 mil vinyl without adhesive on a static cling liner. Gerber Edge users would print on it and then laminate it with white or clear pressure sensitive vinyl to make products that you can then stitch into rider’s suits, seat covers, bar stools, etc.

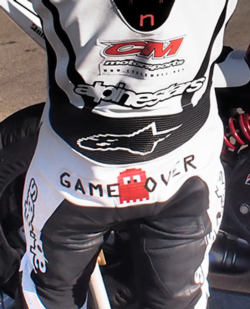
ButtPatches250x309The picture on the left shows the back-side of this road racer who has at least 4 separate patches sewn into his suit. His testimonial.

In addition to graphic markings that were sewn onto products, there are products such as luggage tags, labels that either hang freely without adhesive, or instructional labels that are stitched on one side only, such as you might hang on an inflatable raft. You can also sew a strip of Velcro to both sides of a patch and wrap it around a cross bar such as the ones found on MX  and BMX bikes.

You might think that any old vinyl would work, but that’s not the case. The softer the vinyl is, the more additives (plasticizers) are in it to keep it soft. Plasticizers in the vinyl will naturally migrate to the surface and into adhesives.  These additives are supposed to keep vinyl soft, and they have the same effect on adhesive.

Back in 2009, the adhesives we used on the white laminate were resistant for up to 6 months. Then air would creep in the edges due to the adhesive getting soft, and the layers would start to come apart. That’s the trouble with most adhesives. There are very few that work on soft vinyl… until now. We recently designed a new adhesive to work with highly plasticized films. We are excited to bring the new and improved Pro-Patch™ and laminate combo kits to the market.

MadDogPatch270x349We also made the construction of products easier this time. Instead of printing wrong reading (reverse image) on clear and then laminating with white, now you just print on white (Our 8 mil white Pro-Patch) and laminate with one of the two new Convex laminates we are offering. The new 10 and 20 mil clear Convex laminates will give you the lasting bond you need to the soft white base media. Both laminates use our new proprietary adhesive. One of the printed samples with the 10 mil laminate is shown at the right. The other sample shown below is of a seat cover laminated with the new 20 mil laminate.

DragonSeat1-277x349The resin foils used in the Gerber Edge work great on this product. Solvent inks will likely have an inconsistent bond to the media, as we have found to be the case with most highly plasticized vinyl. Other ink jets such as UV based should work, however they have not been tested at this time, and we are happy to trade media for feedback.

There are plenty of people who have commercial sewing machines (think upholstery repair or embroidery shops) that can sew seat panels, head rests, rider suits, etc. Hook yourself up with one and sell your graphics where your competition doesn’t.

When you are looking for a new product, something different, something unique, to help you go where the others aren’t, remember Pro-Patch™.  You can find available sizes and kits that include the laminate by clicking here – Pro-Patch Combo Kits for the Gerber.